Step Six: Building the Two Chimneys.
The chimney is a convergence of 2 flue pipes, one from the fireplace inside the studio, and the other from the oven outside.
 The oven pipe had to be insulated and then a...... |
 reinforced concrete slab supports the weight of the chimney. |
 The cement blocks that surrounded both flue pipes had to be sawed into various angles, so that the chimney came together at the top. |
 The fireplace pipe had to be angled 8 degrees, so that it would meet the other flue. |
 |
 |
|
 |


The blocks and pipes were so heavy that a rigging system was required to lift
the blocks up,
as the chimney went higher and higher. The ratchet is used from the tower
clock's strike weight winding system.
 Particularly heavy were the 4 sided cement chimney blocks. |
 Without the rigging system, these could never have been put up. |
 |
 |
 |
 |
 And UP and UP it laboriously goes. |
 |

The chimney has reached the roof, therefore, the rest will be assembled from
above.
 |
Now the rigging mechanism has been attached to the roof, |
 |
 |

The joining of the two chimney flues and finishing the cement block structure.
 |
 |
A jig is made to help put cement between the blocks.
And the last of the cement blocks is placed. |
 |

And now, brick by brick to the top!
 |
 Inserting the new flues, and starting the brick work. |
 |
 Now that the chimney is above the roof, the "Bricky" can be used to make smooth mortar joints. |
 |
 |
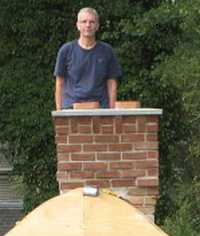
 Inserting the last flue tiles. Flashing is placed around them, to shield them from the final cement slab at the top. |
 The last, decorative row of bricks. |
 |
 Blue stone molding at the top. |
 Laying the final cement slab. |
|